Connect Snowflake to Row Zero
Row Zero's built-in Snowflake connector makes it easy to connect your spreadsheets to Snowflake using username and password, key-pair authentication, or Snowflake OAuth.
Choosing the right authentication method
Key Pair and password authentication are appropriate for individual Row Zero accounts or for connecting service accounts in larger organizations. For the second use case, we recommend creating a dedicated SERVICE user in Snowflake for this purpose, then connecting Row Zero using key pair authentication. Once the connection is created in Row Zero, you can securely share it with the appropriate people in your organization.
OAuth is the best authentication method for organizations where users have their own Snowflake credentials. Any queries using OAuth connections respect the database permissions of the person who runs the query, including RLS and RBAC.
Note: Snowflake will soon be removing password-only sign-ins. While Row Zero still supports authentication via password, we recommend you connect to Snowflake using Key Pair or Snowflake OAuth.
Connect using a Key Pair or Password
Follow the instructions below to connect to Snowflake using a key pair or password.
-
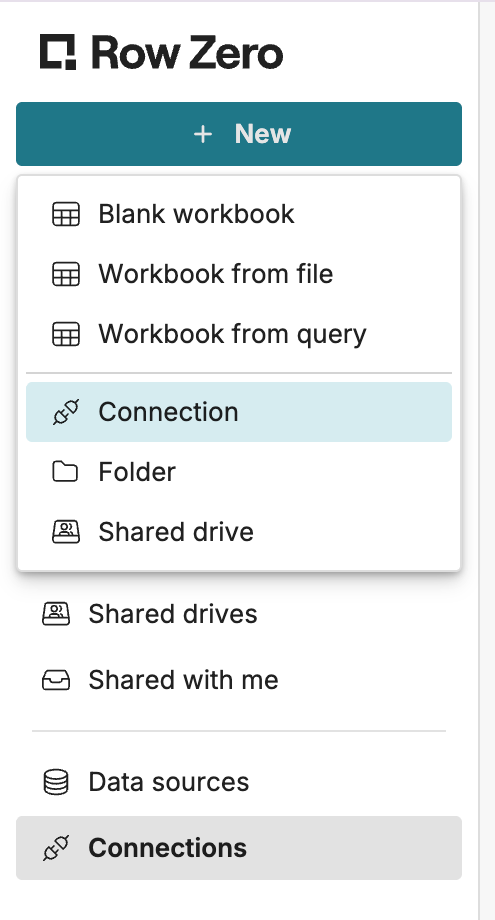
From your Row Zero homepage, click + New in the upper left corner and then choose Connection.
-
Choose Snowflake. The Snowflake connector requires a few pieces of information defined below.
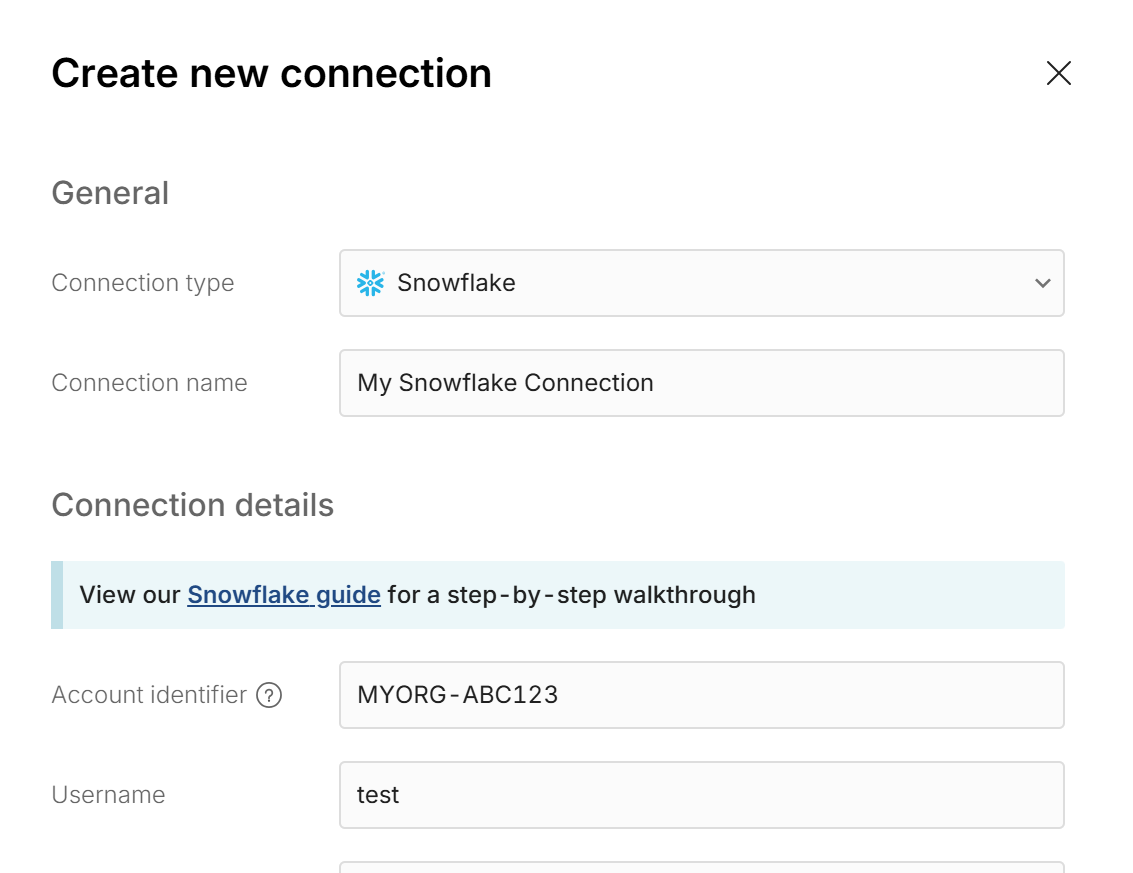
- Connection name: This field can be anything that helps identify the data source being connected (e.g. "Production Data" or "Product Metrics"). It will be visible to all users who have access to this connection.
- Account identifier: This is your organization name and account name combined with a hyphen (-). When logged into Snowflake, find them in the URL: https://app.snowflake.com/org_name/account_name. View Snowflake's docs for additional detail.
- Username: The username used to log into your Snowflake account.
-
Choose your authentication method.
-
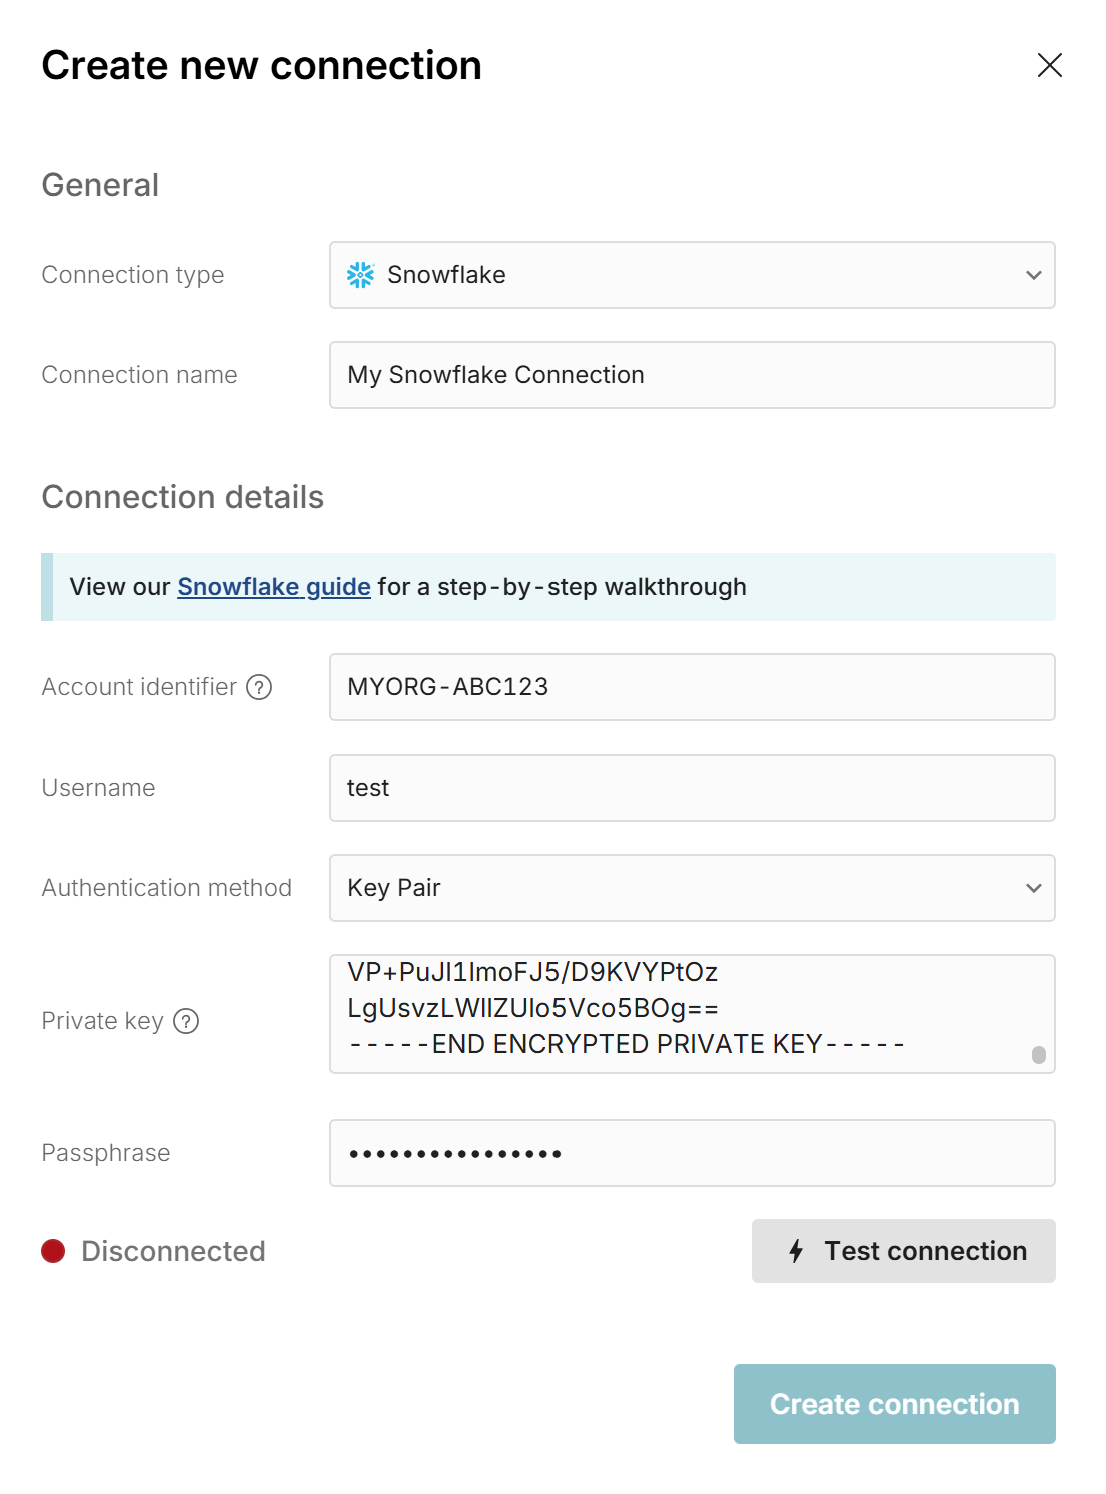
Key Pair: This is the default method. For help setting up a key pair in Snowflake, read Snowflake's user guide here. Row Zero supports both encrypted and unencrypted private keys. Paste the contents of private key that you generated when setting up your Snowflake user. The text should be in PEM format. If you generated an encrypted private key, enter the passphrase in the form field under the private key.
-
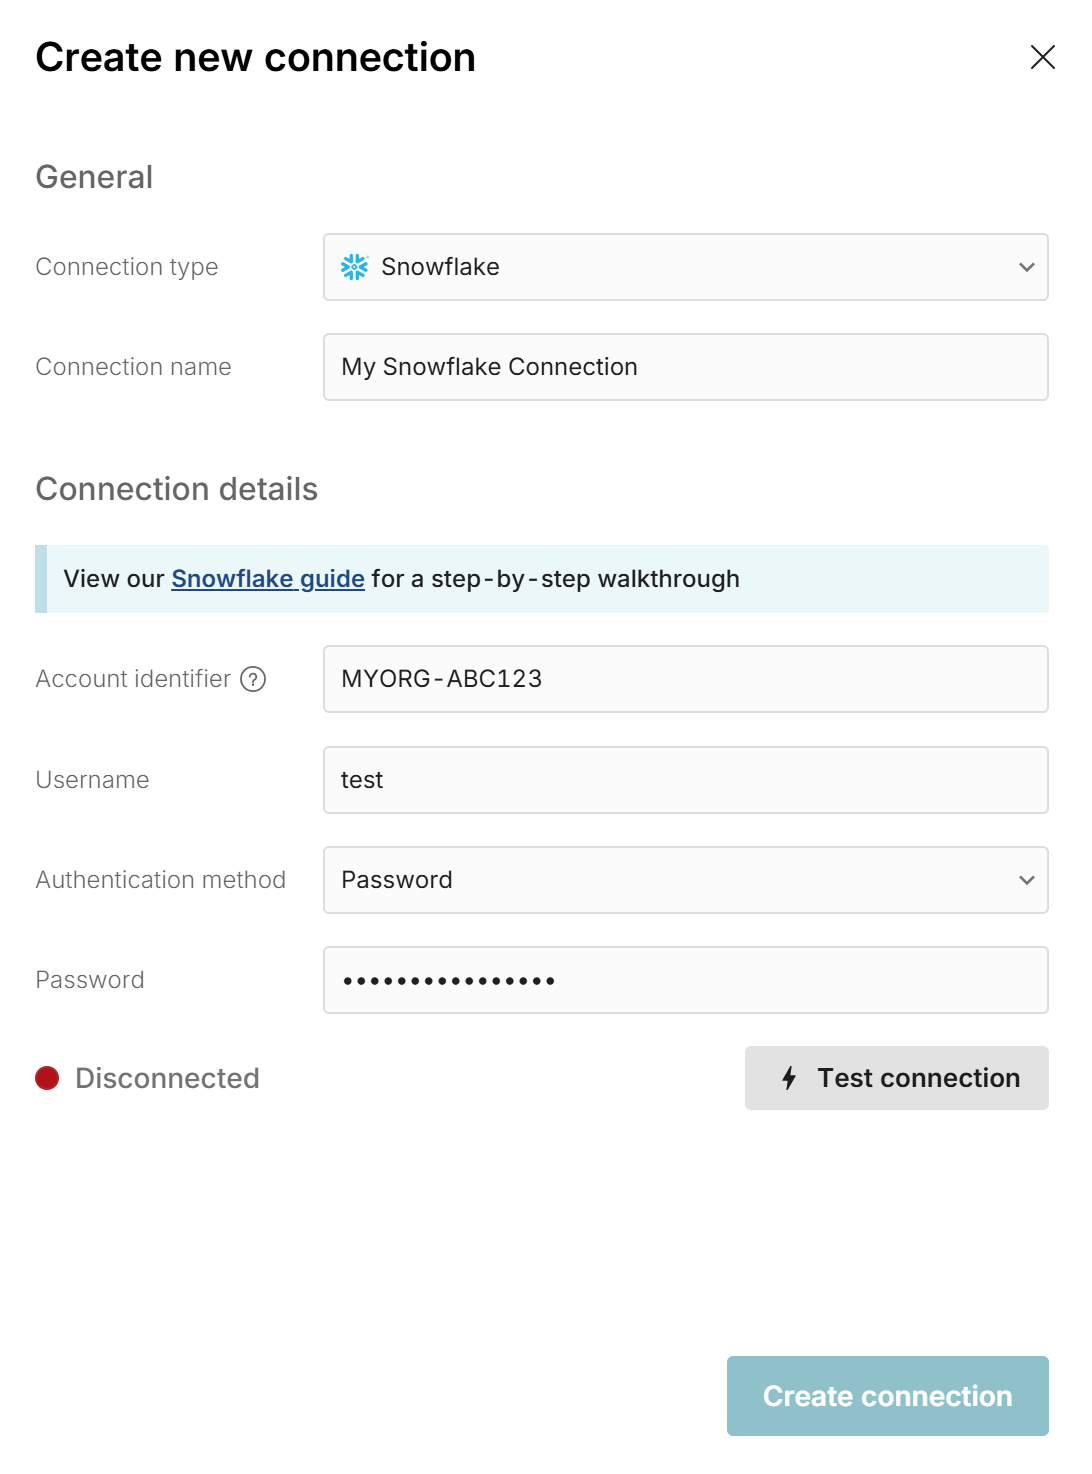
Password: If you still have a legacy Snowflake account that supports password sign in and you do not want to use key-pair authentication, select 'Password' and enter the password you use to log into your Snowflake account.
-
-
If you would like other users to be able to use this account to query from Row Zero, you can securely share the connection with them in Row Zero. This is appropriate if multiple users share a service account. To share your connection in Row Zero:
- Navigate to your Connections page.
- Find the Connection that you'd like to share, click '...' next to the name of the connection, and select 'Manage sharing'.
- Enter the emails of the users or groups that should have access to this connection.
Connect using Snowflake OAuth
If you wish to use Snowflake's built-in OAuth capabilities to provide OAuth-based authentication for your users when they query Snowflake from Row Zero, follow the steps below. The corresponding Snowflake documentation is here and here. You will need administrator privileges in order to configure these settings in your Snowflake account.
CREATE SECURITY INTEGRATION "Row Zero"
    TYPE = OAUTH
    ENABLED = TRUE
    OAUTH_CLIENT = CUSTOM
    OAUTH_CLIENT_TYPE = 'CONFIDENTIAL'
    OAUTH_REDIRECT_URI = 'https://oauth.rowzero.com/oauth/authorization-code/1'
    OAUTH_ENFORCE_PKCE = TRUE
    OAUTH_USE_SECONDARY_ROLES = IMPLICIT
;
Note: OAUTH_USE_SECONDARY_ROLES = IMPLICIT enables users’ secondary roles during OAuth sessions. Users whose DEFAULT_SECONDARY_ROLES is set to ALL will automatically have all granted roles available. Omit this setting if you want only the user’s primary role to be active.
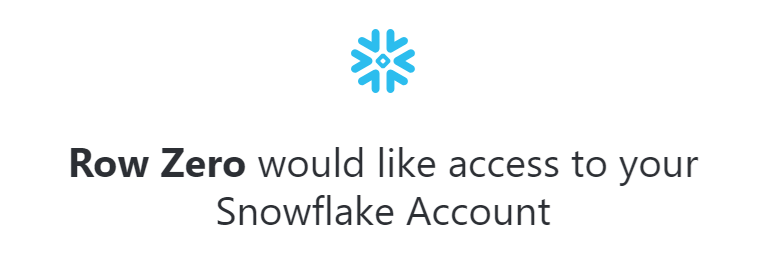
Note: It is important to use the name "Row Zero" because Snowflake uses the security integration name as a display name that it shows to users when they are signing in to Snowflake, like this:
After the create statement succeeds, you will need to run three Snowflake queries to obtain information about your security integration:
SELECT CURRENT_ORGANIZATION_NAME() AS orgname,
       CURRENT_ACCOUNT_NAME() AS accountname,
       CURRENT_ACCOUNT() AS account_locator;
DESCRIBE SECURITY INTEGRATION "Row Zero";SELECT SYSTEM$SHOW_OAUTH_CLIENT_SECRETS('Row Zero');Once you have the above information, contact us at Row Zero so we can schedule a meeting to configure the OAuth integration on our end.
This is the information that we will need from you:
- The following three values from the
SELECT CURRENT...result to construct your Snowflake identifier:orgnameaccountnameaccountlocator
- The following three values from the
DESCRIBE SECURITY INTEGRATIONresult:OAUTH_CLIENT_IDOAUTH_AUTHORIZATION_ENDPOINTOAUTH_TOKEN_ENDPOINT
- The client secrets from the
SHOW_OAUTH_CLIENT_SECRETSresult. Do not share this via email or other unsecured means. We will give you a secure way to provide your secret.
Enable Cortex Analyst
Snowflake Cortex Analyst is Snowflake's text-to-SQL service for answering questions against structured data. Row Zero discovers the semantic views that are available to a Snowflake connection and can use Cortex Analyst to generate SQL against those semantic views.
Prerequisites to enable Cortex Analyst in Row Zero:
- Admin access to the Snowflake account.
- At least one Snowflake semantic view for the data users should query.
- A Row Zero Snowflake connection in the workspace where users will use AI generated queries.
- Enterprise customers must also configure an AI provider in Row Zero.
Enable Cortex Analyst in Snowflake
To enable Cortex in Row Zero, first enable Cortex Analyst in Snowflake.
-
Use a Snowflake administrator role to confirm that Cortex Analyst is enabled for the account.
USE ROLE ACCOUNTADMIN; SHOW PARAMETERS LIKE '%CORTEX%' IN ACCOUNT; -
If
ENABLE_CORTEX_ANALYSTis set toFALSE, enable it.ALTER ACCOUNT SET ENABLE_CORTEX_ANALYST = TRUE; -
If your account uses
CORTEX_MODELS_ALLOWLIST, make sure it is not set toNoneand includes the models your organization allows for Cortex. For example, the command below sets access to all models.ALTER ACCOUNT SET CORTEX_MODELS_ALLOWLIST = 'All'; -
If your Snowflake account is outside a native Cortex Analyst region, enable cross-region inference according to your organization's data residency requirements.
ALTER ACCOUNT SET CORTEX_ENABLED_CROSS_REGION = 'ANY_REGION'; -
You can also set
CORTEX_ENABLED_CROSS_REGIONto a more restrictive Snowflake-supported value, such asAWS_US, if your organization requires region boundaries.
Grant Cortex access to the Row Zero Snowflake role
Next, grant Cortex access to the Row Zero Snowflake role:
-
The Snowflake role used by Row Zero must have either the
SNOWFLAKE.CORTEX_ANALYST_USERdatabase role or the broaderSNOWFLAKE.CORTEX_USERdatabase role.USE ROLE ACCOUNTADMIN; GRANT DATABASE ROLE SNOWFLAKE.CORTEX_ANALYST_USER TO ROLE <rowzero_role>; -
For service account, key-pair, or password connections, grant this to the role used by the connected Snowflake user. For Snowflake OAuth, grant this to the Snowflake role(s) your Row Zero users will use when running queries from Row Zero.
Create and grant access to semantic views
Cortex Analyst needs semantic views that describe the business concepts, metrics, and relationships in your Snowflake data. You can create semantic views in Snowflake with SQL or with Snowflake's semantic view tooling. See Snowflake's guide to creating and managing semantic views.
-
To use a semantic view in Cortex Analyst, grant
REFERENCESandSELECTon the semantic view to the Row Zero role.GRANT USAGE ON DATABASE <database_name> TO ROLE <rowzero_role>; GRANT USAGE ON SCHEMA <database_name>.<schema_name> TO ROLE <rowzero_role>; GRANT REFERENCES, SELECT ON SEMANTIC VIEW <database_name>.<schema_name>.<semantic_view_name> TO ROLE <rowzero_role>; -
If you will create more semantic views in the same schema, consider a future grant.
GRANT REFERENCES, SELECT ON FUTURE SEMANTIC VIEWS IN SCHEMA <database_name>.<schema_name> TO ROLE <rowzero_role>;
Cortex Analyst troubleshooting
- Missing Cortex database role: Grant SNOWFLAKE.CORTEX_ANALYST_USER or SNOWFLAKE.CORTEX_USER to the Snowflake role used by the Row Zero connection.
- Cortex Analyst disabled: Set ENABLE_CORTEX_ANALYST to TRUE.
- No Cortex models allowlisted: Update CORTEX_MODELS_ALLOWLIST so it is not None.
- Cross-region inference disabled: If the account is outside a native Cortex Analyst region, set CORTEX_ENABLED_CROSS_REGION to a supported value.
- No semantic models found: Create at least one semantic view and grant the Row Zero role access to it.
- Users cannot see the generated query source: Verify the Snowflake connection is in the same Row Zero workspace as the workbook and is shared with the user.
Write a query to import Snowflake data
Now that you have created a Snowflake connection, you can import data by writing queries directly from Row Zero. See Data Import to learn how.